Friday, September 10, 2010

Creamery Construction


In the last post I promised an update on the progress of the creamery I am building. Well, here are some pictures of the construction as well as plan of the creamery. As one can see by the white out, it has been through many changes and I am sure this won't be the final version yet.
So far the floors have been trenched to run the plumbing for the floor drains, sinks etc. This was a hell of job. The concrete which had to be cut was 8 inches thick and of old fashioned quality. It bore a machine shop for many decades.
Besides cutting the floor, I have been laying blocks. The make room and the cleaning room will have 2 feet high concrete knee walls. This will prevent the wicking of water behind the material on the wall. This was strongly suggested by the inspector and I don't want to start out on a arguing basis. On top of these walls I will put an 8 foot high frame wall. The large room in the back will be the aging room. The walls of this room are entirely made from concrete and insulated by 6 inch polyisocyanurate rigid foam insulation. I am not sure how to cool this room. I am deliberating various options.


Tuesday, August 31, 2010

Cave Content


I have been upstate for a month or so working among other things on the creamery. I will post an update about the creamery within the next few weeks. As I don't have easy access to internet upstate, I haven't posted much lately, my excuses for my absence.
I had taken all the cheeses with me and put them in the basement under the house. It stays relatively cool in there and the humidity is high. But above all, the micro flora is tremendous as can be seen in the previous post.
The first two picture shows some tommes, varying from a few days to six months of age. The third picture is a cabinet with mainly alpine style cheeses, also of varying age. The last pictures show some blues. These cheeses are about two months old. The bread on the shelf above the cheeses I put there to grow some mold. With this little experiment I try to grow my own blue mold which I can use to inoculate the next batch of blue cheese. The bread is rye.


Tuesday, July 20, 2010

Tiny Mushrooms


Here are some tiny mushrooms. They are growing on one of the cheeses from the previous post. They appeared after about three weeks of aging in the basement upstate. Pretty cute.


Tuesday, July 6, 2010

Rind Development


Last week I took two cheeses upstate to age them there. I wanted to see the difference between the rind development in the two different locations. My cave in Brooklyn seems to be rather sterile these days since I installed a Coolbot about a month ago.
Although the Coolbot keeps the cave at the desired temperature (56F) and the relative humidity is at 90%, I am afraid the constant air-movement created by the Coolbot has chased out all the microorganisms. At least, this is my guess. Some of the rinds on some cheeses even show little cracks. I find this very disconcerting especially as I was planning to control the climate in the planned cave at the creamery upstate in a similar way. I shall have to do some more research and consulting how to prevent this or at least come up with a better compromise.
The first four pictures are of one of the cheese I took upstate. Notice the beautiful mold development after only one week. The next two pictures are of a cheese after about three weeks in the cave in Brooklyn. No growth at all.
The last two pictures are of a cheese I made in early January. This one has been aging since then in the cave in Brooklyn. As one can see from the rind of this cheese, the cave did contain a wide variety of organisms before the Coolbot was installed.


Saturday, June 12, 2010

An Article


This article about me appeared recently in a cheesemaking publication. The publication is part of the popular kitchen series from the editors of Hobby Farms magazine. To read the article, click on the images to enlarge them.

Tuesday, June 8, 2010

Cheese Board


Here are a few cheeses I took out when some friends were over recently. I won't describe them all, just a few words in general and some more words about the ones in the pictures below.
Most cheeses were made over the winter from cows milk . I don't have access to goats milk in winter. The goats have just started to lactate again.
The cheese below I made mid February from Jersey milk. This cheese was made in the style of Mont d'or/Vacherin. Although it doesn't resemble any of these types cheeses I have had in France, I did achieve my goal of making a runny buttery cheese. Some of my friends hailed it the champion on the board.
The cheese in the picture below was made from Holstein milk in the style of Chaource. At the time of cutting the cheese it was 12 days old. It had a smooth milky flavor and a definite undercurrent of the farm.


Friday, June 4, 2010

Coolbot Continued


The Coolbot is working, hurrah. It turns out to be the little miracle device I had thought it would be.
When I first installed the unit, I had misinterpreted the instructions. But with the generous help of the inventor/maker/seller, we finally got it to work right. It has been running the air conditioner for a week now and it works great. It keeps the room at the desired temperature and the humidity level stays at about 95%. This is much better than before. It already cut down the mites population, so the cheeses are save and I don't have to move them upstate.

Friday, May 21, 2010

Coolbot


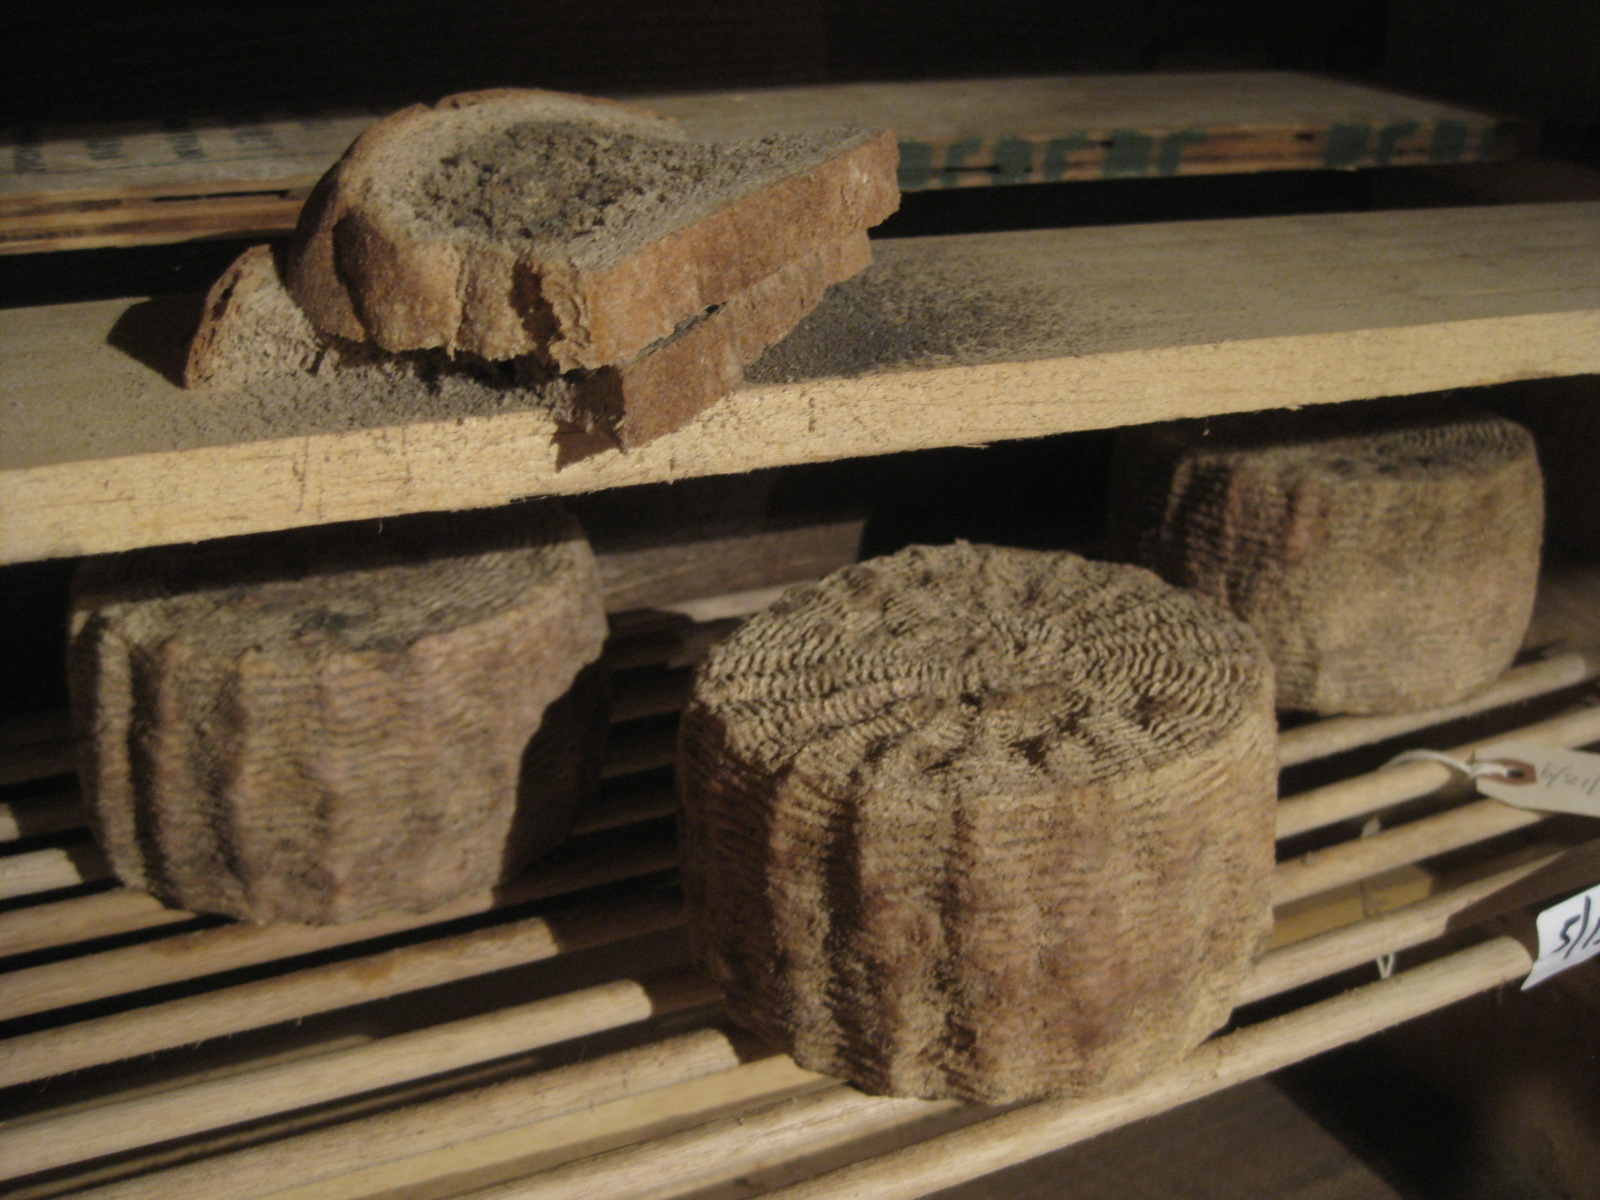
Summer is starting to sneak up on us in New York City and the temperature in the cheese cave is starting to rise. In the previous years I would move all the cheeses upstate to a cooler place now. But this year I would like to keep them in the city as I expect to spend more time here. I would like to tend to the cheeses more regularly.
Last year most of the cheeses grew very wild rinds and were badly infested with cheese mites due to very high humidity. Having the cheese here allows me to monitor the conditions in the cave and keep the rind development and cheese mites under control.
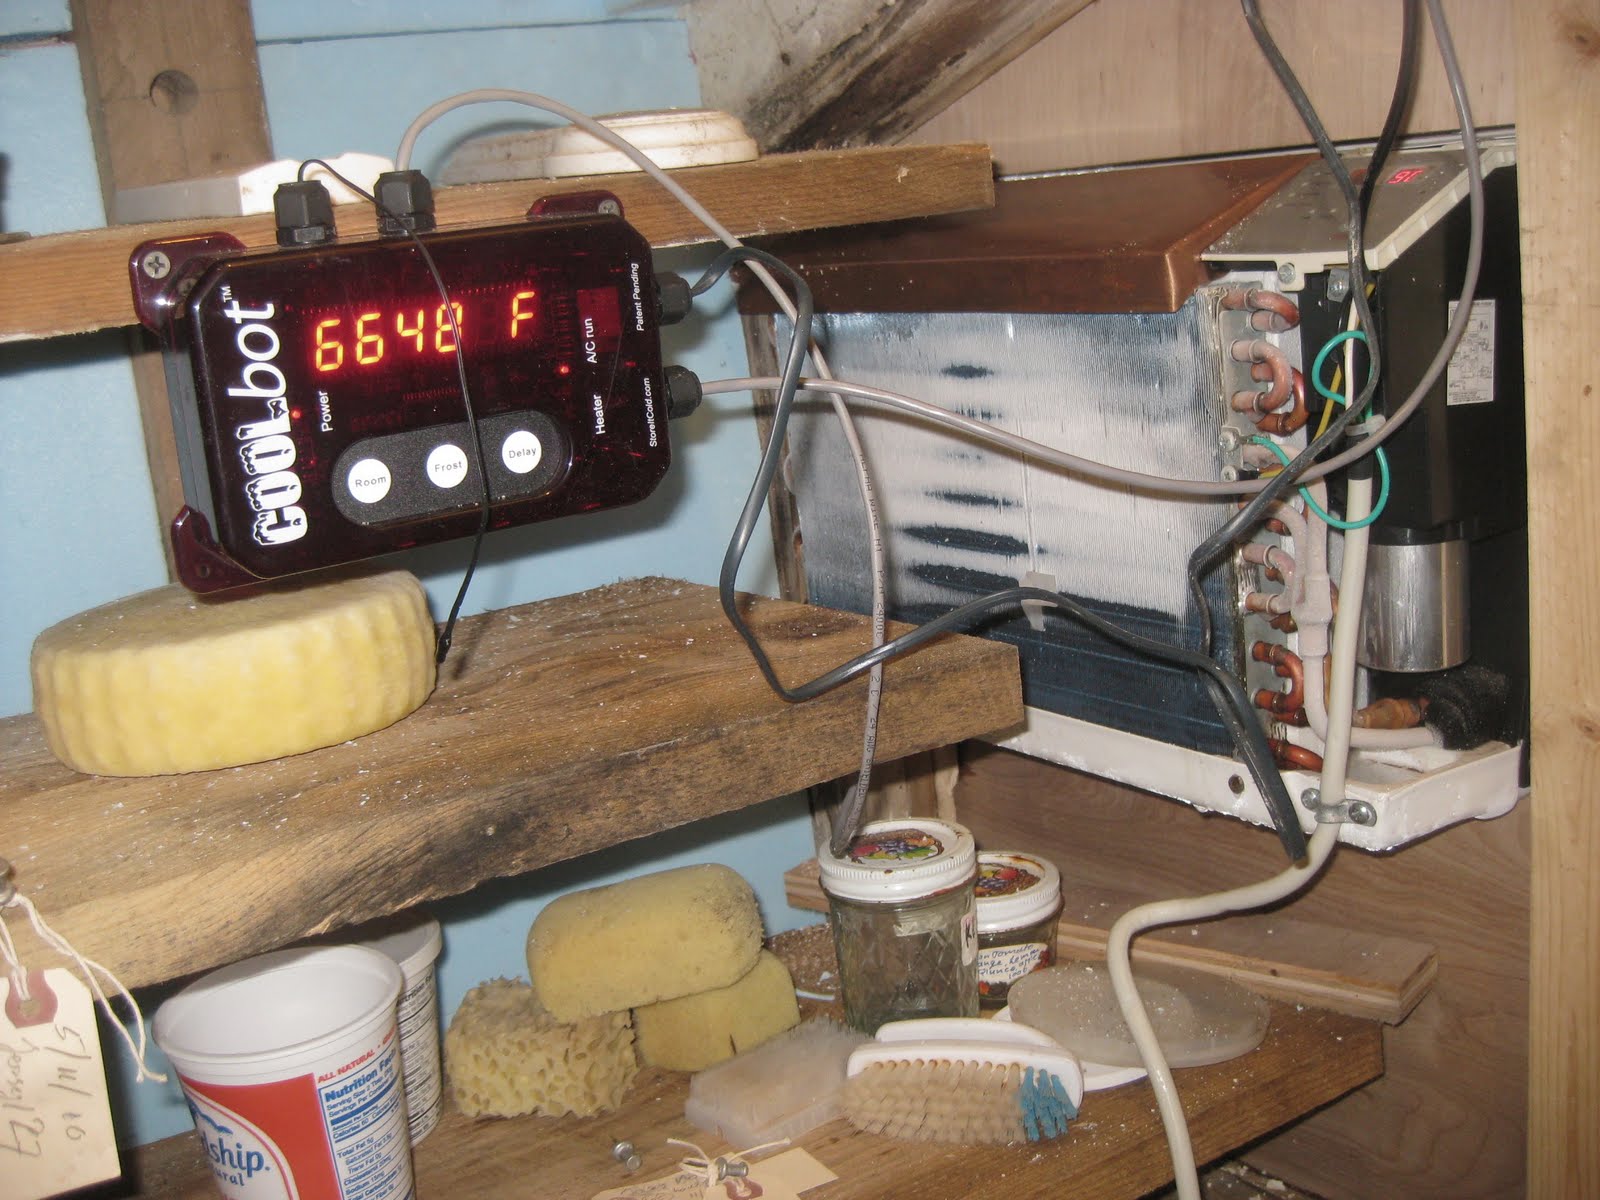
Having said all this, climate control in the cave is of the essence. A while ago I read about a device called Coolbot in an article about cheese caves. I had always thought climate control would be very elaborate and expensive. The systems I have seen are large and pricey. Granted the caves are usually larger but a conventional system for my cave would still be complicated and expensive. This little device seemed to be the answer. As said on the website; the Coolbot turns any off the shelf air conditioner into a turbo charged cooling machine.
I ordered the Coolbot several weeks ago and installed it using a small frigidaire air conditioner I had lying around. This was during the first heat wave in New York. It ran for several days. To my dismay nothing happened, no drop in temperature, nothing. Initially I thought the ac unit wasn't compatible with the Coolbot. According to the Coolbot manual, most fridigaire air conditioners have metal frost sensors which don't work well with the Coolbot. After closer inspection I realized that the air conditioner was broken. I felt relieved. I had almost lost my trust in the Coolbot.
I read the manual again (I have read it several times during my trials) and went on a search for a small LG, Samsung or Haier air conditioner. These are the recommended brands. I needed a unit which was physically small as well as small in BTU's. As the whole cave is formed by at least a foot thick concrete, the only space for the unit is the entrance. Any unit too wide would block the entrance. After some research I found a small Haier, about 18 inches wide, perfect for my application.
After I installed the unit I waited with great anticipation. The temperature in the cave dropped a little but not significantly. I changed the settings on the Coolbot several times, checked the connections between the air conditioner and the Coolbot and read the manual over and over again. The Coolbot wasn't the miracle I had hoped for.
Several weeks past and the outside temperature dropped again and the temperature in the cave wasn't as pressing. But recently the weather has warmed up again and without a doubt, soon it will be sweltering hot in the city. I directed my attention again to the climate in the cave. This had to work.
After reading the manual again I realized that insulation plays an important role. I had not realized that the concrete worked as a cold sink. The concrete of the roof of the cave felt definitely warm. After insulating this with 2 inch styrofoam, the temperature in the cave dropped by 5 degrees after a day. This was a real achievement. I regained my trust in the Coolbot, maybe it could be the miracle device. With the help of the temperature outside, I could now cool the cave to 56 F. But with rising temperature in the city again, it was time for more insulation. Today I insulated most of the other walls with 2 inch styrofoam. Whether this will be is enough, time will tell. I am confident now that I can reach my desired temperature. The Coolbot might just be a small miracle.


Monday, March 29, 2010

Cheese Vat


For a while I have been looking for a cheese vat for the the creamery I am building. I have contacted several makers of cheese making equipment and received as many quotes. As I am planning to make raw milk cheese, I don't need a vat pasteurizer. This lowers the initial investment but a new 150 to 200 gallon round cheese vat costs anywhere in the range of 15-to 20,000 dollar, a major investment. These cheese vats are triple walled and have an insulated outer wall. Hot or cold water circulate in the jacket of the vat. This is done by means of a spray pipe for indirectly cooling or heating the product. These vats last forever and have a high resale value. However, I would rather spend less an buy a used vat. But they are hard to come by, hence the high resale value.
I have located a used cheese vat in the Netherlands. The construction is slightly different. Instead of an insulated stainless steel wall, the outer wall is made of wood. The wood used is Teak which was traditionally used in Holland to built cheese vats. Wood has been banned as a material to make cheese in a long time ago but it is perfectly adequate as a insulating material for the outer wall for a modern cheese vat. In fact, because of the wood these vats hold the temperature better than triple wall stainless steel vats. The wood is treated with a two part food safe lacquer and thus made impervious, a concern my local dairy inspector had. Including shipping to the United States it will only be about a third of the price of a new vat, a major savings. But the vat is a larger than I would have liked. It has capacity of 240 gallon and the minimum filling is one third. This means the smallest batch I can make in this vat is 80 gallon. As I am planning to collect the milk in cans from farmers, it will be a lot of hauling. A 100 pounds a a full can will be back breaking work to fill up the entire vat. But I really like the look of this vat as well as the price.


Saturday, March 27, 2010

Cave Content


In the last post I promised an update of what's in the cave. The first picture shows some soft washed rind cheeses made on February 13 after a recipe for Vacherin. Since I took this picture I have cut into one of the cheeses. Although it is very soft, it doesn't remind me of a Vacherin as I remember them. I have washed the cheeses regularly with brine to develop a rind of the coryneform bacteria. The cheese at the right is from the same batch but I didn't wash it. I let it grow "wild".
The second picture shows some simple tommes with a washed rind. This batch was from mid January. Below it a batch of reblochon made February 22. This was a 5 gallon batch resulting in 5 two pound wheels. I washed 4 wheels regularly with a brine mixture and I let one wheel go wild as shown in the 4th photograph.
Below it two alpine style cheeses, each about 10 pound, one from early January, the other from mid February.
All cheeses mentioned above were made from Jersey milk. The cheeses in the last two pictures were made from Ayrshire milk. Some blue in the first and some lactic washed rind cheese in the last.


Sunday, March 21, 2010

Tomme in Press


I haven't posted for a few weeks and feel awfully guilty. This lack of posting doesn't mean I haven't made any cheeses. On the contrary, I have made quite a few. I will post an update of the content of the cave in a few days. For now just a picture of some tommes I made yesterday being pressed.

Monday, March 1, 2010

67 days


The epoisses is 67 days and holding up very well. This little cheese I removed from the cave at about 45 days and wrapped it in wax paper before putting it in the refrigerator. The rind is dryer than the cheeses I wrapped in saran wrap.


Friday, February 26, 2010

60 days


Last Monday my latest batch of epoisses style cheese reached 60 days. This is the minimum time required by federal law that cheeses made from unpasteurized milk have to be aged before they can be sold. Although I am not selling any cheese because they are not produced in a licensed facility, I am in the process of setting up a small creamery. I am toying with the idea of producing a raw milk epoisses style cheese when I have the plant set up. As far as I know there is no such cheese available on the American market. All the imported epoisses are produced from pasteurized milk and I don't know of any domestic produced cheese in this style.
This batch of epoisses held up remarkably well up to the the 60 days mark. I had moved the cheeses from aging cave at around 45 days, wrapped them and put them in a refrigerator at about 42 degree F. After 60 days they weren't ammoniated at all and when properly stored I think they can easily last for at least another two weeks before becoming too ripe.
The cheeses have been very well received. Below a response from a cheesemonger who tried the epoisses:
"I thoroughly enjoyed the epoisses. It had a nice mustiness and a wonderful dense tang with an almost whiskey sweetness at the finish. It was an accomplished bit of cheesemaking."


Wednesday, February 17, 2010

Alpine Cheese


For a while I have been fascinated by the traditional Alpine style hoop. For the longest time I had no idea how they work and I am still unclear about the proper procedure. I watched several videos online and looked at many images but couldn't really figure it out. Recently I saw some clearer images of the actual hoop in a cheese making supply catalog from Switzerland. This inspired me to try to make a hoop myself and try to figure out how it works. Ad here is the first result. I put one to the test while making an Alpine style cheese. I had also built a small screw type press for it.
It worked alright, I just have to get the hang of it. It would probably be easier if the hoop was much larger like the real ones, 20 to 30 inch in diameter I think. But as a press it did everything it had to do. It pressed the curd and released all the whey.
The cheesecloth I used was perhaps a little too rough. I had bought some linen hoping to create a rind similar to large comtes. But for such a small cheese, the rind ended up being a bit too coarse.