Showing posts with label Equipment. Show all posts

Thursday, May 24, 2012

Leaky Vat


It has been a long time since I posted anything. Lots of thing have happened in the creamery, I could have written a lot and posted a lot of pictures about all the developments. In fact, the creamery is almost done. Next week I will have a final inspection from the inspectors of Agriculture and Markets of NYS. This should be not more than a formality since they were over just last week. I had asked for them to come for a preliminary final inspection so they could tell me what I needed to change or add to finalize the setup. I didn't have to change anything, I just had to get a few things. They wanted to see the milk cans I will be using to collect the milk in. I had just ordered them the previous week and they would be arriving in a few days or so. Beside this they wanted to see some cleaning supplies, brine tanks and a spring on the toilet door. All this is easily done by next Friday.

Although they had already seen it before, they wanted to see the vat again, especially the inside. But I had turned it upside down. Early in the week I had ran water for the first time into the jacket. And lo and behold, it leaked like a sieve. I was bumped out even though I had anticipated this. The vat had been sitting dry for such a long time and I suspected that the wood had shrunk and had lost its ability to hold water. I tried not to worry too much. I remembered from when I was young we had wooden rain barrels. When they arrived they would hardly hold any water but after being soaked for a few days, they would be waterproof.
I sent an email with some pictures to the fabricator in the Netherlands. It being late in the day at this side of the Ocean, I didn't expect a reply until next morning. And indeed as I expected, the maker suspected the wood to have shrunk after such a long period of sitting dry. He recommended turning the vat upside down and pouring water on the bottom. The underside of the wood was not sealed so the wood could absorb the water and the wood would swell.
It has been sitting upside down for several days and it seems that the water has done the trick. The floor under the vat stays dry and the film of water on the vat isn't decreasing. Next week I will turn it back on its feet again. Ready to be inspected.


Monday, September 26, 2011

Moved The Vat


Finally I have moved the vat from its storage into the cheese making room. The floors are done, the walls are ready and I have doors. I also bought some large sinks on Ebay. I am very excited, the creamery starts to crystallize and it looks like I might be making cheese within the for see able future. I even submitted the paperwork with the state.
Their is still much to do however. The electricity needs to be installed, the plumbing for the water has to be put in and the various heating systems have to be installed. Their is quite a bit painting to be done and other miscellaneous touch up work. And than there is the cave. The cooling installation has arrived but I haven't had time to install it yet so that has replaced the vat in the storage. I also have to built the shelving units for the cave. I have been thinking about how to do this efficiently and cost effectively. I haven't come up with a design yet and whether to use wood, metal or a combination for the structural elements. The aging shelves however will be wood. Luckily my inspector has given me that allowance.


Friday, June 4, 2010

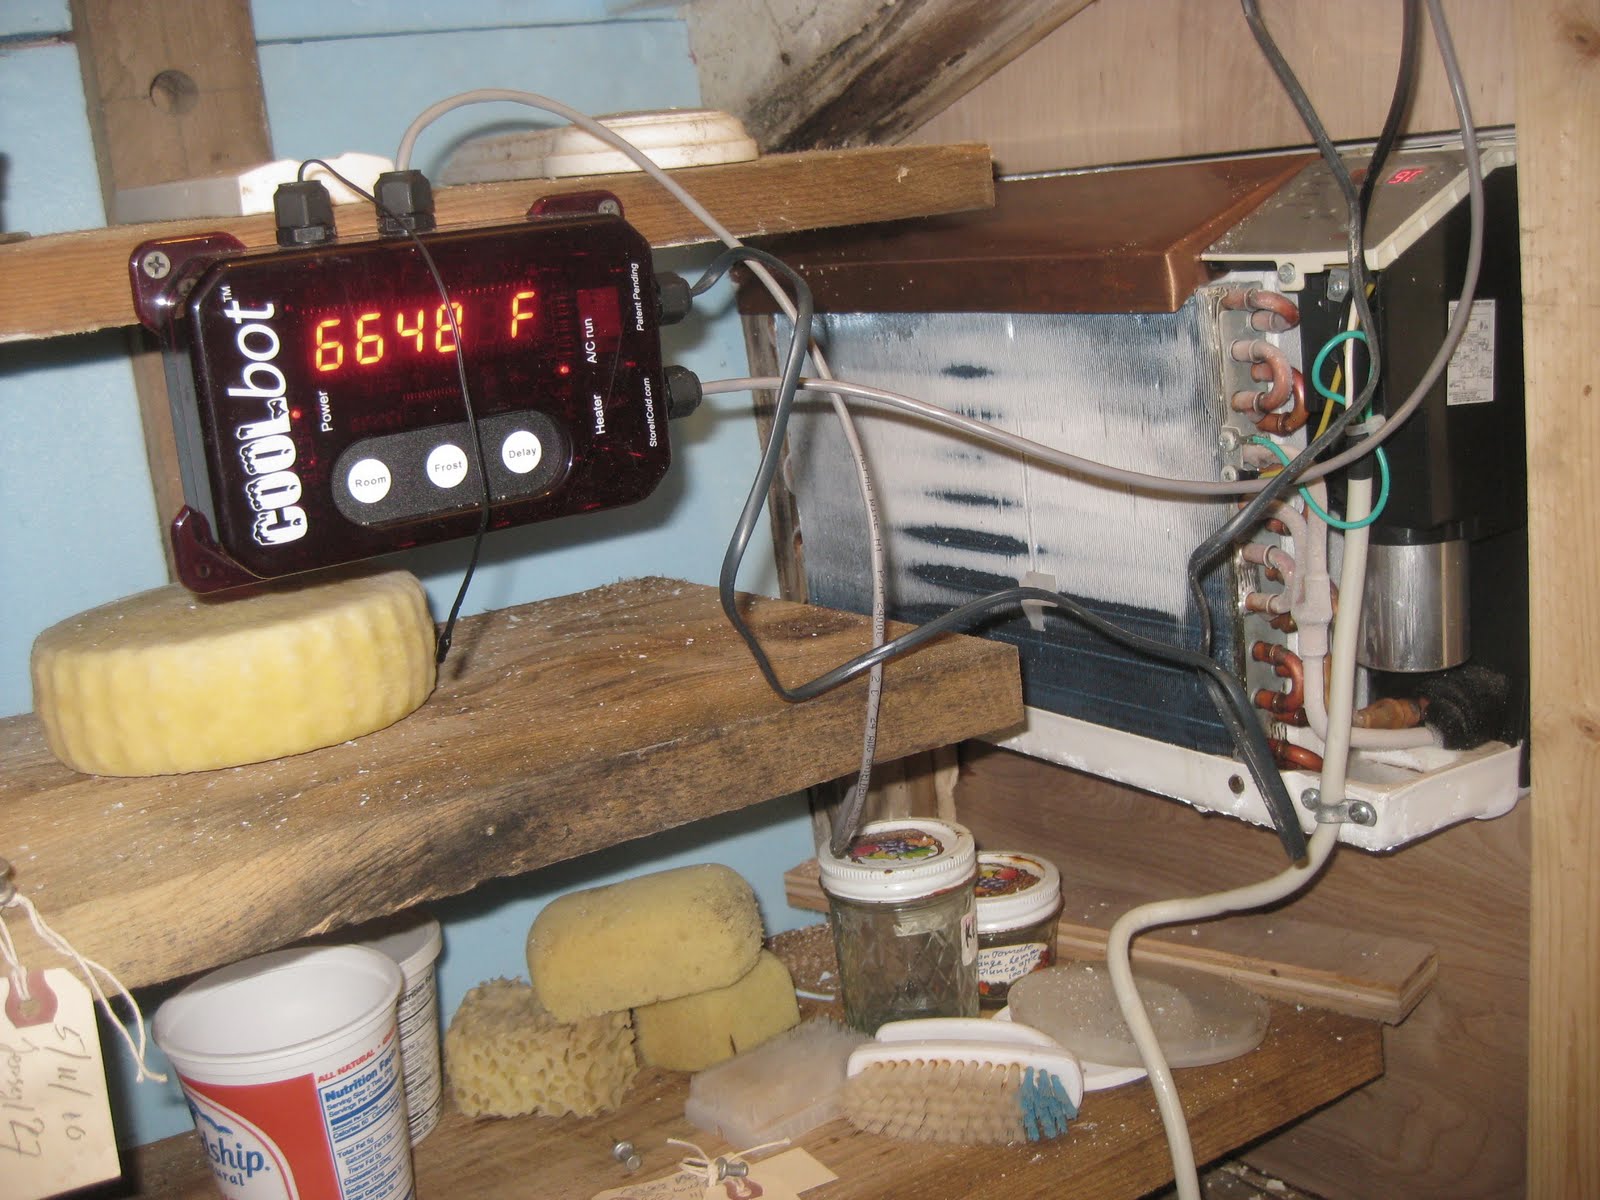
Coolbot Continued


The Coolbot is working, hurrah. It turns out to be the little miracle device I had thought it would be.
When I first installed the unit, I had misinterpreted the instructions. But with the generous help of the inventor/maker/seller, we finally got it to work right. It has been running the air conditioner for a week now and it works great. It keeps the room at the desired temperature and the humidity level stays at about 95%. This is much better than before. It already cut down the mites population, so the cheeses are save and I don't have to move them upstate.

Friday, May 21, 2010

Coolbot


Summer is starting to sneak up on us in New York City and the temperature in the cheese cave is starting to rise. In the previous years I would move all the cheeses upstate to a cooler place now. But this year I would like to keep them in the city as I expect to spend more time here. I would like to tend to the cheeses more regularly.
Last year most of the cheeses grew very wild rinds and were badly infested with cheese mites due to very high humidity. Having the cheese here allows me to monitor the conditions in the cave and keep the rind development and cheese mites under control.
Having said all this, climate control in the cave is of the essence. A while ago I read about a device called Coolbot in an article about cheese caves. I had always thought climate control would be very elaborate and expensive. The systems I have seen are large and pricey. Granted the caves are usually larger but a conventional system for my cave would still be complicated and expensive. This little device seemed to be the answer. As said on the website; the Coolbot turns any off the shelf air conditioner into a turbo charged cooling machine.
I ordered the Coolbot several weeks ago and installed it using a small frigidaire air conditioner I had lying around. This was during the first heat wave in New York. It ran for several days. To my dismay nothing happened, no drop in temperature, nothing. Initially I thought the ac unit wasn't compatible with the Coolbot. According to the Coolbot manual, most fridigaire air conditioners have metal frost sensors which don't work well with the Coolbot. After closer inspection I realized that the air conditioner was broken. I felt relieved. I had almost lost my trust in the Coolbot.
I read the manual again (I have read it several times during my trials) and went on a search for a small LG, Samsung or Haier air conditioner. These are the recommended brands. I needed a unit which was physically small as well as small in BTU's. As the whole cave is formed by at least a foot thick concrete, the only space for the unit is the entrance. Any unit too wide would block the entrance. After some research I found a small Haier, about 18 inches wide, perfect for my application.
After I installed the unit I waited with great anticipation. The temperature in the cave dropped a little but not significantly. I changed the settings on the Coolbot several times, checked the connections between the air conditioner and the Coolbot and read the manual over and over again. The Coolbot wasn't the miracle I had hoped for.
Several weeks past and the outside temperature dropped again and the temperature in the cave wasn't as pressing. But recently the weather has warmed up again and without a doubt, soon it will be sweltering hot in the city. I directed my attention again to the climate in the cave. This had to work.
After reading the manual again I realized that insulation plays an important role. I had not realized that the concrete worked as a cold sink. The concrete of the roof of the cave felt definitely warm. After insulating this with 2 inch styrofoam, the temperature in the cave dropped by 5 degrees after a day. This was a real achievement. I regained my trust in the Coolbot, maybe it could be the miracle device. With the help of the temperature outside, I could now cool the cave to 56 F. But with rising temperature in the city again, it was time for more insulation. Today I insulated most of the other walls with 2 inch styrofoam. Whether this will be is enough, time will tell. I am confident now that I can reach my desired temperature. The Coolbot might just be a small miracle.


Monday, March 29, 2010

Cheese Vat


For a while I have been looking for a cheese vat for the the creamery I am building. I have contacted several makers of cheese making equipment and received as many quotes. As I am planning to make raw milk cheese, I don't need a vat pasteurizer. This lowers the initial investment but a new 150 to 200 gallon round cheese vat costs anywhere in the range of 15-to 20,000 dollar, a major investment. These cheese vats are triple walled and have an insulated outer wall. Hot or cold water circulate in the jacket of the vat. This is done by means of a spray pipe for indirectly cooling or heating the product. These vats last forever and have a high resale value. However, I would rather spend less an buy a used vat. But they are hard to come by, hence the high resale value.
I have located a used cheese vat in the Netherlands. The construction is slightly different. Instead of an insulated stainless steel wall, the outer wall is made of wood. The wood used is Teak which was traditionally used in Holland to built cheese vats. Wood has been banned as a material to make cheese in a long time ago but it is perfectly adequate as a insulating material for the outer wall for a modern cheese vat. In fact, because of the wood these vats hold the temperature better than triple wall stainless steel vats. The wood is treated with a two part food safe lacquer and thus made impervious, a concern my local dairy inspector had. Including shipping to the United States it will only be about a third of the price of a new vat, a major savings. But the vat is a larger than I would have liked. It has capacity of 240 gallon and the minimum filling is one third. This means the smallest batch I can make in this vat is 80 gallon. As I am planning to collect the milk in cans from farmers, it will be a lot of hauling. A 100 pounds a a full can will be back breaking work to fill up the entire vat. But I really like the look of this vat as well as the price.


Wednesday, February 17, 2010

Alpine Cheese


For a while I have been fascinated by the traditional Alpine style hoop. For the longest time I had no idea how they work and I am still unclear about the proper procedure. I watched several videos online and looked at many images but couldn't really figure it out. Recently I saw some clearer images of the actual hoop in a cheese making supply catalog from Switzerland. This inspired me to try to make a hoop myself and try to figure out how it works. Ad here is the first result. I put one to the test while making an Alpine style cheese. I had also built a small screw type press for it.
It worked alright, I just have to get the hang of it. It would probably be easier if the hoop was much larger like the real ones, 20 to 30 inch in diameter I think. But as a press it did everything it had to do. It pressed the curd and released all the whey.
The cheesecloth I used was perhaps a little too rough. I had bought some linen hoping to create a rind similar to large comtes. But for such a small cheese, the rind ended up being a bit too coarse.


Wednesday, January 13, 2010

Humidifier


Since the cold weather here in Brooklyn, the temperature in the cave dropped down to 40 degrees Fahrenheit. I already had a little heater in the cave, but it wasn't adequate. I installed another little heater. This raised the temperature to the desired level but, although I have a tray with water sitting on the heaters, the humidity was negatively affected. The dry weather outside and the heat inside made the humidity drop to 70 %. To compensate I had to install something like a humidifier.
I don't know anything about humidifiers, but I guess, there is not much to know. All they have to do is put moisture into the air. I found a simple vaporizer humidifier the first store I went in.
Seeing it produce all that steam while testing it, I didn't want to put the unit directly into the cave being afraid of creating a sauna in there. So I hooked up a hose to the humidifier and lead this into the cave. This way the steam will have cooled before entering the cave. The humidifier runs on a timer, set at about half an hour on every two hours. We'll see how it goes. No doubt, some cheeses will like it better than others.


Thursday, August 20, 2009

Curd Cutters


Recently I made some new curd cutters. I have been using a knife to cut the curd but I found it very difficult to cut the curd to small particles. Most cheeses require the curd to be cut into rice grain size to drain out the whey.
To build the cutters, I welded some stainless steel frames and stretches stainless steel fishing wire across. The wire isn't very tautt but the thickness of the wire makes it stiff enough to cut the curd. It works great.


Thursday, June 25, 2009

Stainless Steel Lever Cheese Press


Usually, when I go upstate at this time of year, there are a lot of outside chores which don't allow for making cheese. This year it has been raining a lot. Rain all day was again in the forecast for last Saturday so I decided to make some cheese. An opportunity to test the new cheese press which I had built the previous week. 
I got some milk from my Jersey farmer in the morning and decided to make some simple tomme cheese. I didn't take pictures of the process, neither did I photograph the wheels fresh from the press. But I can assure you that the press worked wonderfully. It produced constant pressure and was easily adjusted. As you can see, I can press multiple cheeses in this system. The press is great addition to my supply of equipment. 


Sunday, June 21, 2009

Stainless Steel Lever Cheese Press


I made a stainless steel cheese press from some scrap material I had lying around. I got fed up with the pressing system I have been using. It doesn't press evenly and it is hard to adjust. I have a two wooden lever presses but they are both too small to press the cheese I make but to large for my kitchen. 
The stainless press is fully adjustable. I can raise or lower the pressing stamp. The pressing force is adjustable by adding or removing weights or by moving the weight to another notch. I can also easily transport the press. I'll report back after its first use.


Tuesday, March 24, 2009

Frenhau


A few weeks ago I made this implement based on images I found online. Called a Frenhau, it is traditionally used in the Auvergne to cut the curds for St. Nectaire cheese.


Thursday, March 5, 2009

Larger cheese vat


A few weeks ago I got another vat. During spring and summer I make cheese upstate as well and I did not want to travel back and forth with my cheese vat. I bought an 80 quarts stock pot, twice as large as the one I use downstate. I had to balance it with a pebble on the stove.

Here is the first time it is in use.


the milk in the vat


the DVS (direct vat starter) culture on top of the milk


checking the temperature


checking the flocculation


flocculation has begun


the curd is cut


cooking the curd


checking the pH and temperature of the whey


pressing the cheeses


brine


another miracle