Thursday, June 25, 2009

Stainless Steel Lever Cheese Press


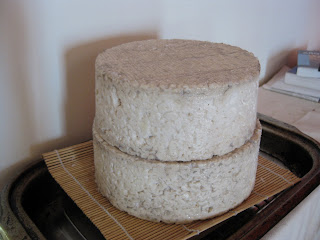
Usually, when I go upstate at this time of year, there are a lot of outside chores which don't allow for making cheese. This year it has been raining a lot. Rain all day was again in the forecast for last Saturday so I decided to make some cheese. An opportunity to test the new cheese press which I had built the previous week. 
I got some milk from my Jersey farmer in the morning and decided to make some simple tomme cheese. I didn't take pictures of the process, neither did I photograph the wheels fresh from the press. But I can assure you that the press worked wonderfully. It produced constant pressure and was easily adjusted. As you can see, I can press multiple cheeses in this system. The press is great addition to my supply of equipment. 


Sunday, June 21, 2009

Stainless Steel Lever Cheese Press


I made a stainless steel cheese press from some scrap material I had lying around. I got fed up with the pressing system I have been using. It doesn't press evenly and it is hard to adjust. I have a two wooden lever presses but they are both too small to press the cheese I make but to large for my kitchen. 
The stainless press is fully adjustable. I can raise or lower the pressing stamp. The pressing force is adjustable by adding or removing weights or by moving the weight to another notch. I can also easily transport the press. I'll report back after its first use.


Friday, June 19, 2009

Lactic Goat Cheese


Here are some lactic goat cheeses aging in a refrigerator. The cheeses are from different batches made on different dates. The greenish mold on some of the cheeses to the left happened while the temperature in the refrigerator was to high for a few days while I was away. These cheeses weren't sprayed with Penicillium candidum, the white mold which would have protected the cheese from this contamination. It does not affect the cheese too much, the fungus just tastes a little musty.


Monday, June 15, 2009

St. Nectaire


These are some photographs from the procedure of making St. Nectaire. I based my procedure on the description of the making of this cheese by Patrick Rance. On page 217 in his book " The French Cheese Book" he describes a visit in 1973 to the farm of Madame Fereyrol in Chandeze, just outside Besse. 
She started making cheese at 6.30 a.m. with about 25 gallons of milk from the thirty seven Salers cows. The milk was renneted at once at 31C (33C in winter) and coagulated in 45 minutes at which point she started to cut the curd. For the cutting Madame Fereyrol used a menole. After some research, I came across a frenhau. This is the traditional tool of cutting the curd for Cantal cheese. Both cheeses being from the Auvergne, I figured that the curd cutting tools must be fairly similar. I made mine after the images I found online. 
Patrick Rance describes how Madame Fereyrol worked her menole slowly up and down through the curd until a uniform cut of mais sized grains was established. The temperature of the curd needs to be kept at least up to renneting temperature.  Madame Fereyrol brought hers op to 35C by introducing water at 40-45C. Adding warmer water might seal up the curd and prevent whey expulsion.
She then stirred the curd to firm up the grains. The description doesn't mention a time, but in my experience, this usually takes around 40 minutes. The curds then settled on the bottom of the vat for a few minutes after being brought together with a menadou (also called a musadour or mouisadou). I haven't figured out how to use a tool like this although I have seen some films showing the use of it. The implement is gently taken round the sides of the vat to pile up the curd and encourage it to mass together. This takes usually 10 minutes according to Rance. At this point the pousset or puise-serum, an upside down mushroom, is used to press down the curd and remove most of the whey. 
I use a large lid to press down the curd and expel some whey. The whey I remove from the vat with a saucepan. In time I shall make a menadou or mousadour.
The curd is now cut into cubes, 10 centimeters, and distributed between the cheese moulds. She pressed the curd down by hand into the shallow moulds, gently at first, gradually more firmly. Patrick Rance then describes how Madame Fereyrol put the cheeses into deeper moulds under a lever-and -counter-weight press for one minute on each face. She then applied casein marking plaques and salt on each face. She applied 25 grams for each cheese while The Syndicat suggest 30 grams. Here Patrick Rance makes one of his numerous comments about salt in cheese. He says: "...and I am all for moderation".
The cheeses are then pressed for eight to twelve hours before turning and pressed again for the same amount of time.
The two batches of cheese based on this procedure I made recently did deviate from the recipe. 
The moulds I used were larger than the traditional ones used and I brine salted the cheeses. In du time, I shall try to stay closer to the recipe and try to make a traditional St. Nectaire.


Saturday, June 13, 2009

May Alpine


A little while ago I wrote how the grass is greener, the herbs and flowers plentiful and the milk much richer in this time of year. The farmers started haying to get the richest and most nutritious hay for the winter. I have taken the opportunity to make some Alpine cheeses and as the pictures below show, the cheeses turn out much richer in color. The milk came from Jersey cows. (Yes I know, the cows in the picture above are not Jerseys, in fact, they are not even dairy cows). The milk is full of fat has plenty protein and is richer in minerals and flavor producing compounds. Even the ricotta I made from the whey was a rich yellow and was fuller of flavor then in winter.
Having made cheese only for a little over a year, this is the first time I experience the full implications of the seasons on the milk quality. After struggling with blowing cheeses from milk contaminated with gas producing bacteria, it is a real joy to make cheese from milk of a different grade.


Thursday, June 11, 2009

Ayrshire


I have found a farm with Ayshire cows around here. Originated in Ayshire, Scotland, Ayshire cattle is known for their hardiness, low somatic cell counts and effectiveness of converting feed into milk. Now considered a heritage breed, they were the most common breed in New England in the 1800s. The Ayshire cow produces milk with a smaller fat globule which breaks down easier during the aging process of the cheese. Needless to say, I am very excited and so far I have made two batches of St. Nectaire with their milk.


Tuesday, June 9, 2009

St. Paulin


A few weeks ago I cut into the St. Paulin I made in January. I used the procedure from Frank Kosikowski's book "Cheese and Fermented Milk Foods, Volume II: Procedure and Analysis." Although the cheese does not look so great, it does taste good. Precisely like a St. Paulin should taste like; mild and buttery. It turned out a little too salty to my taste, though others didn't mind the saltiness. I checked my notes and compared them with the recipe. The cheese had been too long in the brine. I do try to be moderate with the use of salt. In "The French Cheese Book", the author Patrick Rance keeps complaining about cheeses being too salty. "I am all for moderation" he said about the amounts of salt being used while salting St. Nectaire cheeses.


Sunday, June 7, 2009

Goat Blue


Here are some picture of the Goat blue cheeses op close. These pictures were taken a few days ago. The cheeses are two and a half week old. I love to take these type of photographs. I find the moulds enormously fascinating.


Friday, June 5, 2009

Goat Blue


Here is an update of the blue goat cheese I made a few weeks ago. The picture above shows the salting procedure. The recipe asked for a cheese to be salted on top and stacked with another cheese. This should have been done in a cooler environment, but conditions required in the recipes are not always available to the home cheese maker. So a look for the most practical solution and being aware that the conditions are not always optimum. 
In the photograph below, the cheeses have just been moved to the aging refrigerator and the last picture shows the bottom cheese after having been in the fridge for a week.
In the last post I wrote about moving the cheeses upstate to a cooler environment. I did not move the blue cheese, nor the lactic cheeses. Because I age these cheese in refrigerators, I can keep them here in Brooklyn. When I first made a blue cheese, I put it in the cave with the other cheeses and after a few days, all the cheese started to grow blue molds. I did some research and asked a experienced cheese maker about this phenomena. He said that once blue mold was introduced in a cave, it will contaminate everything else. His reply was supported by what I read in other sources. But when I on a visit recently at a large new aging facility in Vermont, I saw blue cheeses aging in a cave among many other different types of cheeses. When I asked about cross contamination, they said that it wasn't a problem. Sometime a bloomy rind cheese might shows some spots of blue mold but this could have resulted from contaminated hands according to my guide. 
Well, I am thrown again. Perhaps because the circumstances and conditions are so different in many cases, there might not be just one answer. For now though, I will keep my blue cheeses here in the refrigerators in Brooklyn. This gives me at least some cheeses to pamper on a daily bases.


Wednesday, June 3, 2009

The Great Move


It is getting too hot in the city to keep my cheeses here. The temperature in my cave under the sidewalk in Brooklyn has gone up to 60F (15C) with peaks of 65F on hotter days. I don't want to spend money and time on artificial climate control in this cave. I don't think it is worth it. So on May 29 I moved the cheeses upstate. The cellar under our house there keeps a relative constant temperature of 55F (12C) and a humidity of 90%. 
Sadly, I won't be there to turn, air or pamper the cheeses every day. But at least once a week I will attend to them. It is not a perfect situation but it is better then have the cheeses sweat in the summer and a great chance of being infested with maggots.


Tuesday, June 2, 2009

Lactic Goat Cheese Drying


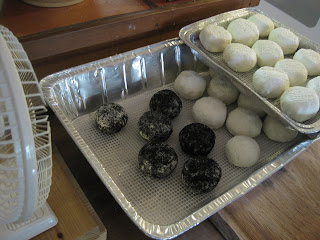
A recent batch of lactic type goat cheese in the "drying room". Up front are the ash covered cheeses from the previous post.